Materials and hatches
A hatch fills an area with the pattern of a material, a build-up draws the layers of a wall, floor or roof in one go. Both take their materials from the project library, and both draw their patterns at a fixed size on paper, so a hatch reads the same at 1:50 as at 1:5. They are drawn in plans, sections and details alike.
The project's materials
The materials a project draws with are in its library: Project library on the project's overview, tab Materials. The hatch and build-up tools offer only these.
- A new project starts with the building set: concrete, reinforced concrete, masonry, lightweight masonry, insulation soft and hard, timber cross-cut and along the grain, screed, plaster, soil, gravel, steel, sealing and glass.
- More come from the office, with Add from office library, among them manufacturers' products imported from ÖKOBAUDAT or an IFC file: see Office library and project library.
- Everyone in the project sees the materials; whoever may edit the project changes them. Changes are kept with Save changes in the bar at the bottom of the page.
- A hatch keeps a reference to its material, not a copy of the pattern: a renamed material or a changed pattern changes every hatch of it in the project. A material taken away leaves its hatches drawn as their outline, and their properties say "(not in the project)" until another material is picked.
Changing a pattern
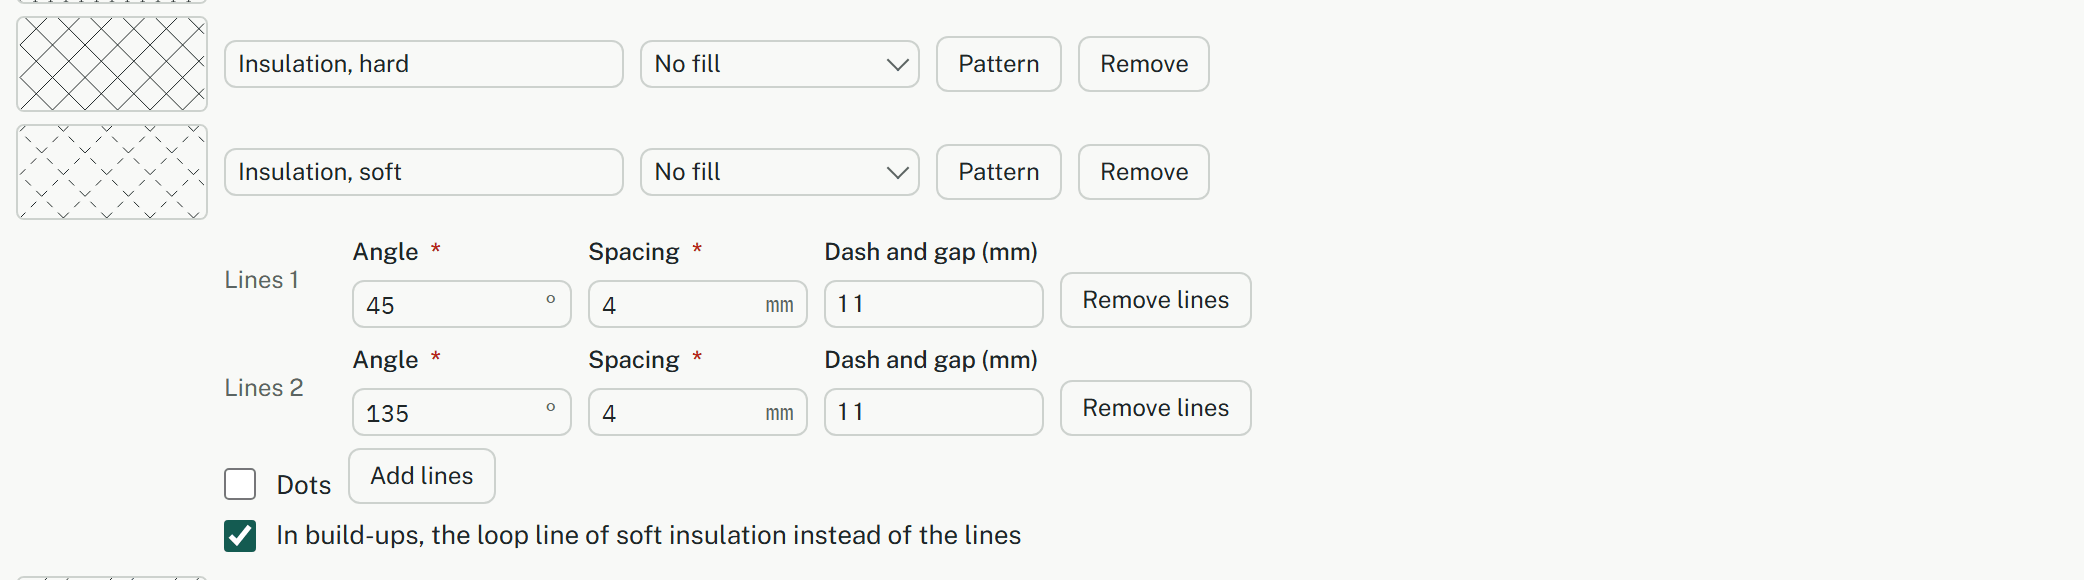
- In the list, each material has its name, a sample as it prints, and its fill: No fill, Grey (like a cut surface) or Solid (black on screen and paper).
- Pattern opens the pattern. Each row of lines has an Angle, a Spacing in mm on paper and Dash and gap (mm), for example 4 1; left empty, the lines are solid. Add lines gives up to four rows, Remove lines takes one away.
- Dots adds dots with their Spacing and Size, as for concrete or plaster.
- The last box draws soft insulation in build-ups with its loop line instead of the lines. Plain hatches of the material keep the lines.
Hatching an area
- Start Hatch (H). On the command line, pick the Material and, if the pattern should turn, the Angle.
- Move the pointer into the area: while it is inside, its outline shows. Lines in view that close around the point bound it, and a figure standing free inside, such as a pipe, stays open as a hole.
- Click, or type a point as x,y. Each click is one hatch and one undo step. The tool stays on for the next area; Enter finishes.
- What bounds an area: lines, polylines, arcs and circles, walls as the plan draws them (so a click inside a wall fills just that wall), the reference storey, and in a section the cut on the reference layer. Rooms, dimensions, notes and other hatches don't.
- Hatches go on the Hatching layer, so they can be hidden or left out of a print together.
- A hatch is a copy of the area: it doesn't follow if the lines are moved later. Select it to give it another material or angle; to change its outline, delete it and hatch again.
When nothing fills
"Nothing to hatch here" means the lines in view don't close around the point.
- Zoom out until the whole area is in view: lines outside the view don't count.
- The lines must meet exactly. A gap of a millimetre is enough to let the area run out, so draw with object snap on (F3) and look for open corners.
Drawing a build-up
- Start Build-up (AU). The command line shows its Layers, typed as thickness in mm and material, separated by semicolons: 15 Plaster; 240 Masonry; 160 Insulation, soft; 10 Plaster. The material is written as the project names it.
- Or pick one under Build-up: its layers go into the typed field, where you can still change them. As typed keeps your own.
- Click the points of the path the layers start from, such as the face of a cut wall; they snap as usual. U takes a point back, Enter ends the path. Instead, Along an edge (E) lays the path along a straight edge you click.
- Click the side the layers go to. The first layer lies against the path, the others follow outwards. While the pointer moves, the layers show on its side.

- At a corner of the path the layers are mitred. A path that turns too tightly for the thickness is refused.
- Each layer is drawn with its material's hatch, solid materials black, a material the project no longer has as an outline.
- A build-up is one element and one undo step, on the Hatching layer. The tool stays on for the next one.
Filling an area with layers
For a floor or roof known from the top down to a slab of any depth:
- Start Build-up (AU) and choose Into an area (A).
- Click inside a closed area, as for a hatch.
- Click near the edge the layers start from. The preview follows the edge nearest the pointer.
The layers span the area's whole width, and the last one fills what is left of its depth.
Changing and exploding a build-up
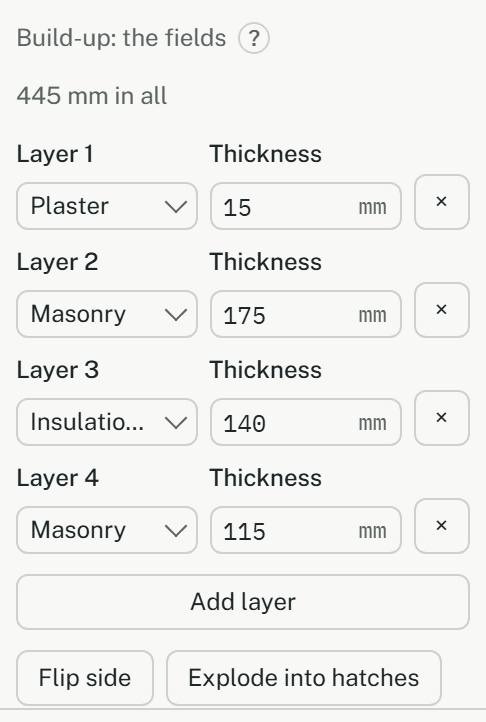
Select a build-up, and its properties list the layers from the path outwards, with the thickness in all.
- Change a layer's material or Thickness, take it away with ×, or Add layer. The layers belong to this build-up alone: nothing in the library ever changes a build-up already drawn, and changing this one changes no other.
- Flip side puts the layers on the other side of the path.
- Explode into hatches replaces the build-up by a hatch per layer and its edges as lines, to change one piece alone. Soft insulation then shows its pattern's lines, as plain hatches do. Undo brings the build-up back.
The project's build-ups
The tab Build-ups of the project library holds the build-ups the tool offers, each with a name and its layers written as in the tool. A new project starts with five: outer walls with external insulation, cavity and monolithic, a floor on a slab and a warm flat roof. A build-up can only name materials of the project; one that uses a material taken away is named above the list, so it can be fixed before saving.
Limits
- An area is found among the lines in view only, and arcs count as short straight pieces.
- Lines that don't quite meet aren't closed: there is no gap tolerance.
- A hatch's outline and a build-up's path can't be changed by grips.
- A pattern too dense at a scale draws no lines rather than slowing the plan down.